
Longitudinal Wrapping
Lay the rockshield mesh parallel to the pipeline axis (longitudinal direction).
- Cutting: Unroll and cut to the required length of the pipeline.
- Alignment: Lay mesh flat on the surface, covering from end to end.
- Overlap: Keep overlap ≥ 10cm between adjacent meshes at the bottom.
- Fixing: Fix circumferentially every 0.5m using ties or wire.
- Inspection: Ensure a close fit without looseness or lifted edges.

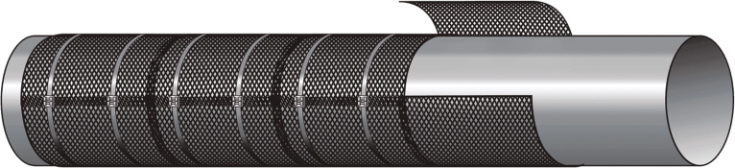
Latitudinal Wrapping
Wrap the rockshield mesh around the pipeline transversely, similar to a "ring clamp."
- Sizing: Length = Circumference + 100mm; Width = Diameter + 150mm.
- Overlap: Circumferential overlap ≥ 10cm, positioned at the bottom of the pipeline.
- Fixing: Secure tightly using cable ties or binding wire.
- Sequence: Install pieces one by one with an axial overlap of 10cm.
- Inspection: Ensure all joints between adjacent pieces are tight.

Spiral Wrapping
Wrap the rockshield mesh around the pipeline in a continuous spiral at an angle.
- Angle: Start from one end at an angle of approximately 30°–45°.
- Continuity: Wrap spirally forward while maintaining mesh tension.
- Overlap: Maintain a consistent overlap of ≥ 10cm between turns.
- Reinforcement: Secure with ties at necessary positions and bends.
- Coverage: Ensure full surface coverage with no exposed pipe areas.
Best HDPE Rockshield Installation: 4 Professional Methods
Effective HDPE Rockshield installation is essential for protecting pipeline coatings from rock damage during backfilling. As a leading manufacturer, MAISHI provides this comprehensive guide to ensure your project meets the highest industry standards.
- Longitudinal HDPE Rockshield Installation
- Latitudinal Wrapping Techniques
- Spiral & Double-layer Protection
During the HDPE Rockshield installation process, selecting the right wrapping method depends on the pipe diameter and terrain. Whether you are using the longitudinal or latitudinal approach, the HDPE Rockshield installation must be tight and secure to prevent shifting.

Our products comply with HDPE material standards (External Link) to ensure long-term durability. For specific project quotes or technical data sheets, please contact our engineering team (Internal Link) for a professional HDPE Rockshield installation solution.